costco_vodka

Russian Vodka Hack

Russian Embassy buys its vodka like a suburban dad — at Costco

Russian Ambassador Sergey Kislyak is Washington’s most dangerous diplomat

Politico

…..  At Russia’s fortress-like Embassy on Wisconsin Avenue, north of Washington’s Georgetown neighborhood, Kislyak also hosts parties for fellow diplomats, Russia specialists and other Washingtonians with personal or business ties to Russia. (Though elegant, those functions may also reveal hints of Russia’s economic malaise: At one recent event, bartenders served Kirkland vodka—the brand sold by the bulk-discount retailer Costco.)

The Russian Embassy did not respond to a request for comment.


fbi_geek_squad

FBI Enlists Geek Squad

By Tom Jackman January 9 
 
At a giant Best Buy repair shop in Brooks, Ky., Geek Squad technicians work on computers owned by people across the country, delving into them to retrieve lost data. Over several years, a handful of those workers have notified the FBI when they see signs of child pornography, earning payments from the agency.  Read full article at Washington Post
 
NOTE – In this case, the alleged files weree in “unallocated space” – they had been deleted.  The tech had to intentionlly scan for dleted files and would not have been able to see or recover them without special tools.

How To Rack Mount a Behringer X32 Producer

The Behringer X32 Producer can be easily mounted into a 19 inch console rackmount or road case, however it isn’t obvious and there is nothing in the Behringer manual.  

The X32 Producer ships for desktop use with rounded molded plastic sides.  In the box are two steel brackets with hole patterns that do not line up with the screw spacing om the sides.


[[{“type”:”media”,”view_mode”:”media_large”,”fid”:”407″,”attributes”:{“alt”:””,”class”:”media-image”,”height”:”675″,”width”:”800″}}]]


The plastic sides are held on by 5 screws – remove the screws and the sides to access the metal frame.

[[{“type”:”media”,”view_mode”:”media_large”,”fid”:”408″,”attributes”:{“alt”:””,”class”:”media-image”,”height”:”466″,”width”:”800″}}]]

There are 4 mounting holes near the bottom of the console for mounting the rackmount brackets.  Use 4 of the 5 screws that held the side piece to the console.

[[{“type”:”media”,”view_mode”:”media_large”,”fid”:”409″,”attributes”:{“alt”:””,”class”:”media-image”,”height”:”767″,”width”:”800″}}]]

Behringer X32 Producer rack mounted in an SKB Mighty Gig Rig from B&H.


hp-drm-og_0

HP “Time Bomb” Locks Out 3rd Party Ink Cartridges

The Guardian Alex Hern
Hewlett-Packard printers have suddenly started rejecting ink cartridges produced or refilled by third parties, apparently due to a “ticking timebomb” left by the manufacturer in an update released in March 2016.
The printers, in the company’s OfficeJet, OfficeJet Pro and OfficeJet Pro X ranges, accepted refills made by third-parties and sold at a significantly lower price than the official ink made and sold by HP itself. But on 13 September, the printers began to reject those refills, with error messages including “cartridge problem”, “one or more cartridges are missing or damaged” and “older generation cartridge”.
Adding insult to injury, the printers themselves have not received a software update recently, suggesting that the last update, six months ago, had a delayed-action effect. In doing so, it prevented affected users from getting the word out about the lockdown and discouraging others in a similar situation from updating their own printers.  read more…
UPDATE  HP issued a non-apology and made it possible for users to back out the change by applying patched firmware to their printers.  See the HP Blog Post. “As a remedy for the small number of affected customers, we will issue an optional firmware update that will remove the dynamic security feature. We expect the update to be ready within two weeks and will post additional information here as it becomes available”.  Emphasis is mine.
Infrared image using FLIR camera

FLIR ONE Thermal Imaging Camera & Nexus 5X Phone- Camera Not Recognized

The FLIR ONE is a thermal imaging camera attachment for iOS and Android devices.  The FLIR model for Android uses a micro USB connector while several newer devices including the Nexus 5X employ the newer USB Type-C connector.  Many micro USB to USB Type-C adaptors do not support the 5X being the host and the FLIR being the device (using a USB C to C cable to a Mac, for example, the Mac is the host and the 5X is the device).   Using a non-compliant connector the FLIR ONE Android app does not see the camera.

The VicTsing USB 3.1 Type-C to Micro USB Convert Connector  does work with the Nexus 5X and FLIR ONE.  The FLIR app connects to the camera and appears to work well.

Web searches return warnings about using un-tested micro USB to USB C adaptors or USB Type-C to female micro USB cables for charging.  A good discussion by Geoff Hoff can be found here.  Using the app Current Monitor by Eric Johnson, the VicTsing USB 3.1 Type-C to Micro USB Convert Connector appears to be safe to use for charging.  The charge current started in FAST mode, then when the phone reached 95% charge it switched to TAPER mode and reduced current through 100%.  Nonetheless, I plan on using the adaptor only for the FLIR and sticking with the USB C charger that came with the Nexus 5X.


Thermal image of Max


macramupgrade

Boosting Performace of Older Macs

Older MacBook Pro computers made between 2009 and 2012 are routinely retired because they seem slow or will not hold a charge.  These models can have several more useful years with some simple and inexpensive upgrades.  The newer models – like the mid 2012 has a CPU almost as fast as the 2015 models.  Apple has made major improvements in battery life and the beautiful retina display however the perceived speed hasn’t changed much.  If you bought your son or daughter a shiny new Mac when they started college in 2012, that computer, with a few upgrades would be a perfect computer for their high school sibling.  

3 Simple Upgrades for about $250 can save you from buying a new $1,800 Mac.

Number 1   Battery

After four years of frequent use a MacBook Pro battery may need to be replaced.  Symptoms of a bad battery are short operating times after a full charge or erratic battery level readings.  There are several things you can do to get the most out of a new battery but a bad battery needs to be replaced.  There are two approaches to replacing a Mac battery, buy an original Apple battery or buy a third party or OEM battery.  The Apple battery will probably work well and will certainly cost a great deal.  An OEM battery may or may not work well and will cost a lot less.  

Apple stopped making the battery user replaceable around 2009.  To get an original Apple replacement battery that is not  used or new but old, you need to have Apple do the work.

These Mac notebooks have built-in batteries:
MacBook (13-inch, Late 2009) and later 
All MacBook Air computers
All MacBook Pro computers with Retina display
MacBook Pro (13-inch, Mid 2009) and later; MacBook Pro (15-inch, Mid 2009) and later 
 
There are a handful of reputable OEM suppliers of replacement batteries and battery replacement is not difficult.  My preference is to use an OEM battery that has a one year warranty.  These sell for around $40 and if they perform well you will have saved well over $100.  If they have problems you will know within a month or two.  Order a replacement under warranty and try again.  Carefully reading reviews can help find suppliers with a good track record, but no one is perfect.  
 
Sites such as https://www.ifixit.com/ have easy to follow step by step guides. The battery replacement procedure for a mid 2012 MacBook Pro can be found here  (forget the video and just use the photos and instructions). 
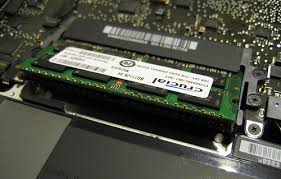
Number 2 Memory

Older MacBook Pros shipped with 2 or 4 GB  (gigabytes) of memory, or RAM.  Software has gotten bigger with more features and people tend to open several applications at once which can really slow down a Mac without enough RAM.  Replacing the memory in a MacBook Pro is very easy and replacing the existing memory with 2  4 GB sticks for 8 GB costs about $40.  13 inch MacBook Pros made in 2010 or later can take up to 16 GB in 2 sticks of 8 GB and costs about $70.  For most high school students, 8 is enough.
 
Crucial.com has an excellent tool on their website to find what type of memory your specific model uses. Crucial memory is available direct or from Amazon and others however be sure to order the exact model if using the Crucial.com tool of make sure the memory is Mac compatible.  

Number 3 Hard Disk or SSD

  • Upgrade your hard disk to a higher performance drive.
  • Upgrade your disk to an SSD.

Most older MacBook Pro laptops shipped with 5400 rpm hard drives.  Switching the old drive ou for a 7200 rpm drive of larger capacity is an an inexpensive upgrade for better performance and capacity.  A 1 TB 7200 rpm drive costs about $70 (8/16/16).  Swapping out drives is relatively easy with step by step instructions at sites such as https://www.ifixit.com.   If you have a larger budget and can make due with less capacity, an SSD drive will provide a substantial performance boost and longer battery life.  The ADATA Premier SP550 480 GB 2.5 Inch SATA III SSD sells for $115 at B&H (8/16/16).

Most of the time to replace these parts is spent removing the back cover so it’s a good idea to do them all at once.  Once your computer is back together you will need to either reinstall the software from your old drive or do a fresh install.  I recommend a fresh install which will provide the latest software and eliminate lots of old software and other junk that accumulates over time.  A fresh install will also improve performance.  For more about how to do a fresh install read my article How to Create an OS/X USB Thumb-Drive Installer.

Questions?  use the contact form to get in touch.


install_osx

How to Create an OS/X USB Thumb-Drive Installer

Apple makes keeping your Mac software up-to-date a snap with the Updates feature of the Apple App Store App.  While upgrading from one version of OS/X to the next is usually successful, performance on older Macs that have had several updates can suffer.  A fresh install can provide the latest version of software without the downsides of multiple updates.  Another advantage of a fresh install is the oportunity to restore only the programs and data you really want.
A fresh install will involve completely erasing your existing hard disk or SSD so having at least 2 backups is critical.  A current Time Machine backup can be used to restore programs and data and can be used as the 1st backup.  For the 2nd backup you can make a second Time Machine backup to a different drive, backup to another computer onyour network that has enough free space or upgrade your hard disk with a faster 7200 rpm drive or a very fast SSD drive.  See my article on Boosting Performace of Older Macs.  The old disk can be kept as an archive backup.
 
With OS X Sierra, El Capitan, Yosemite, or Mavericks, you can use a USB flash drive or other removable media as a startup disk from which to install OS X.  
 
Download the OS X installer from the Mac App Store.
Quit the installer if it opens automatically after downloading.
The installer will be in your Applications folder.
 
Mount your USB flash drive. 
Open the Terminal app, which is in the Utilities folder of your Applications folder.
Use the command diskutil list to find the name of the USB drive.
 
Use the createinstallmedia command in Terminal to create the bootable installer.
Make sure that the appropriate Install OS X app is in your Applications folder.
 
The following examples assume that the OS X installer is in your Applications folder and the name of your USB flash drive or other volume is MyVolume: replace the name MyVolume with the name of your USB drive.
 
Example for Sierra:

sudo /Applications/Install\ macOS\ Sierra.app/Contents/Resources/createinstallmedia –volume /Volumes/MyVolume –applicationpath /Applications/Install\ macOS\ Sierra.app
 
 
Example for El Capitan:
sudo /Applications/Install\ OS\ X\ El\ Capitan.app/Contents/Resources/createinstallmedia –volume /Volumes/MyVolume –applicationpath /Applications/Install\ OS\ X\ El\ Capitan.app
 
Example for Yosemite:
sudo /Applications/Install\ OS\ X\ Yosemite.app/Contents/Resources/createinstallmedia –volume /Volumes/MyVolume –applicationpath /Applications/Install\ OS\ X\ Yosemite.app
 
Note – El Capitain requires the following Mac hardware:
 
iMac (Mid-2007 or newer)
MacBook (13-inch Aluminum, Late 2008), (13-inch, Early 2009 or newer)
MacBook Pro (13-inch, Mid-2009 or newer), (15-inch, Mid / Late 2007 or newer), (17-inch, Late 2007 or newer)
MacBook Air (Late 2008 or newer)
Mac Mini (Early 2009 or newer)
 

Questions?  use the contact form to get in touch.